
⭐ Why Bed Leveling Is the Most Important First Step
If I had to pick one thing that separates successful 3D printing from failed prints, it’s bed leveling. I’ve been running Creality Ender 3 printers for over 5 years, and I can tell you: 90% of first-layer failures come from an improperly leveled bed.
A level bed is the foundation of everything. You can have the best printer, the best filament, perfect settings — but if your bed is off by 0.2mm, your prints will fail.
This guide walks you through the exact process I use every time I print, including the tricks that save me from wasted filament.
⭐ What You’ll Need
- Ender 3 or Ender 3 Pro (this method works for both)
- A piece of paper (standard A4 or printer paper — ~0.1mm thick)
- Leveling tool (usually comes in the Ender 3 box, or a hex wrench works fine)
- 3-5 minutes of your time
That’s it. No fancy tools, no expensive upgrades needed.
⭐ Step 1: Home the Printer and Clean the Bed
Why this matters: Dirt, dust, and old plastic bits prevent accurate leveling.
- Turn on your Ender 3
- Go to Menu → Prepare → Auto Home (this moves the nozzle to the home position)
- Let it finish — you should hear the nozzle hit the endstops
- Once homed, manually lift the nozzle using Menu → Prepare → Move Axis → Move Z and set it to 5mm above the bed
- Wipe the bed with a clean, dry cloth — remove any plastic strings, dust, or dried filament
- Wipe the nozzle tip as well with the cloth (while it’s cool)
Pro tip: If you see stubborn plastic on the nozzle, heat it to 200°C for 10 seconds, then wipe with the cloth while wearing a heat-resistant glove. The plastic peels off much easier when warm.
⭐ Step 2: Lower the Nozzle Close to the Bed
- Go to Menu → Prepare → Move Axis → Move Z
- Lower the Z-axis slowly to around 5mm above the bed
- Do this carefully — watch the nozzle as it lowers. You want to stop when it’s close but not touching
Why manual movement? Using the auto-leveling feature (if you have it) isn’t enough — the printer’s sensors aren’t perfectly accurate. Manual leveling + sensor = best results.
⭐ Step 3: Place the Paper Under the Nozzle
This is where the magic happens.
- Take your piece of paper
- Slide it under the nozzle (it should be roughly centered on the bed)
- The paper acts as a feeler gauge — it’s exactly the right thickness (0.1mm) for proper first-layer clearance
The paper test:
- If the nozzle is too high, the paper slides freely with no resistance
- If the nozzle is too low, you can’t pull the paper out — it’s stuck
- Perfect leveling: You should feel slight drag on the paper as you pull it — like the nozzle is gently holding it
This feeling takes 5 minutes to learn, then it becomes muscle memory.

⭐ Step 4: Adjust the Bed Using the Leveling Knobs
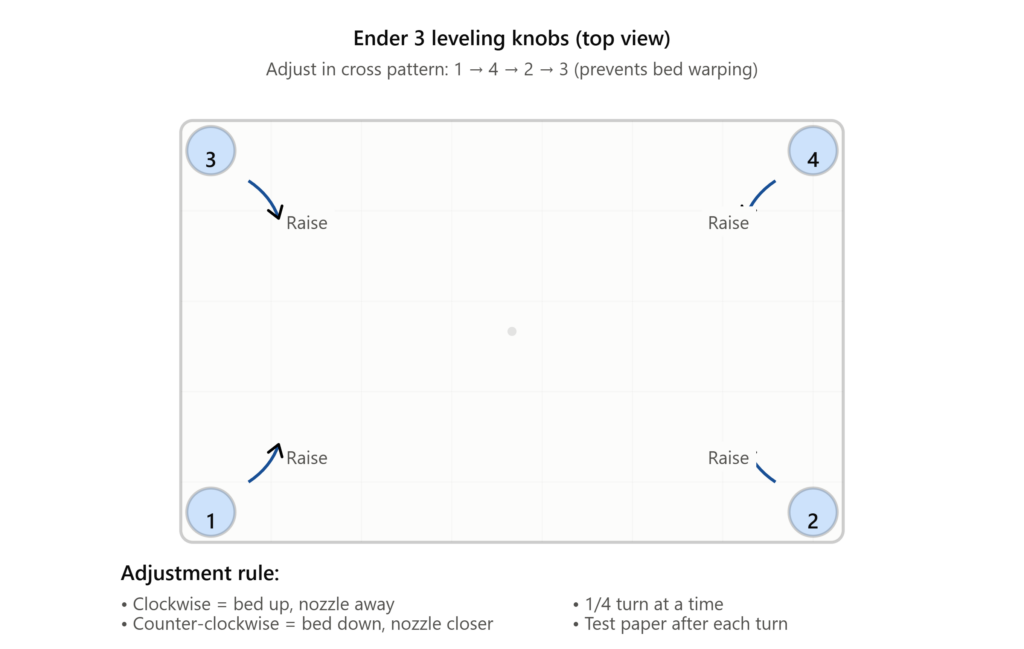
Your Ender 3 has 4 leveling knobs under the bed (one at each corner). These raise and lower the bed.
Important: You’re not moving the nozzle — you’re moving the bed. This is key.
How to adjust:
- Locate the knobs — they’re underneath the bed, accessible from the front and sides
- For the front-left knob:
- Place paper under the front-left corner of the nozzle
- Slide the paper back and forth
- If it’s too loose: Turn the knob clockwise (raise the bed) — about 1/4 turn
- If it’s too tight: Turn the knob counter-clockwise (lower the bed) — about 1/4 turn
- Test again with the paper until you feel that perfect drag
- Repeat for all 4 corners:
- Front-left
- Front-right
- Back-left
- Back-right
Order matters: Do corners in a cross pattern (front-left → back-right → front-right → back-left) rather than going around the perimeter. This prevents warping the bed.
Real talk:
This takes 2-3 minutes of patience. Turn a knob, test the paper, adjust. It feels slow at first, but you’re building muscle memory. After your 3rd or 4th time leveling, you’ll nail it in under 90 seconds.
⭐ Step 5: Test the Whole Bed Surface
Once you’ve done all 4 corners, test 5 more spots across the bed to ensure consistency:
- Center of bed
- Between each corner and center
Place the paper at each spot and adjust slightly if needed. This catches the cases where one corner is over-tight or too loose.
Why this extra step? Uneven beds cause mid-print failures where one side sticks perfectly but the other lifts.
⭐ Step 6: Do a Test Print (The Real Validation)
Manual leveling is 95% accurate, but the real test is printing.
- Slice a small test model (I use a 20mm cube or a bed leveling test file — free ones exist everywhere)
- Start the print
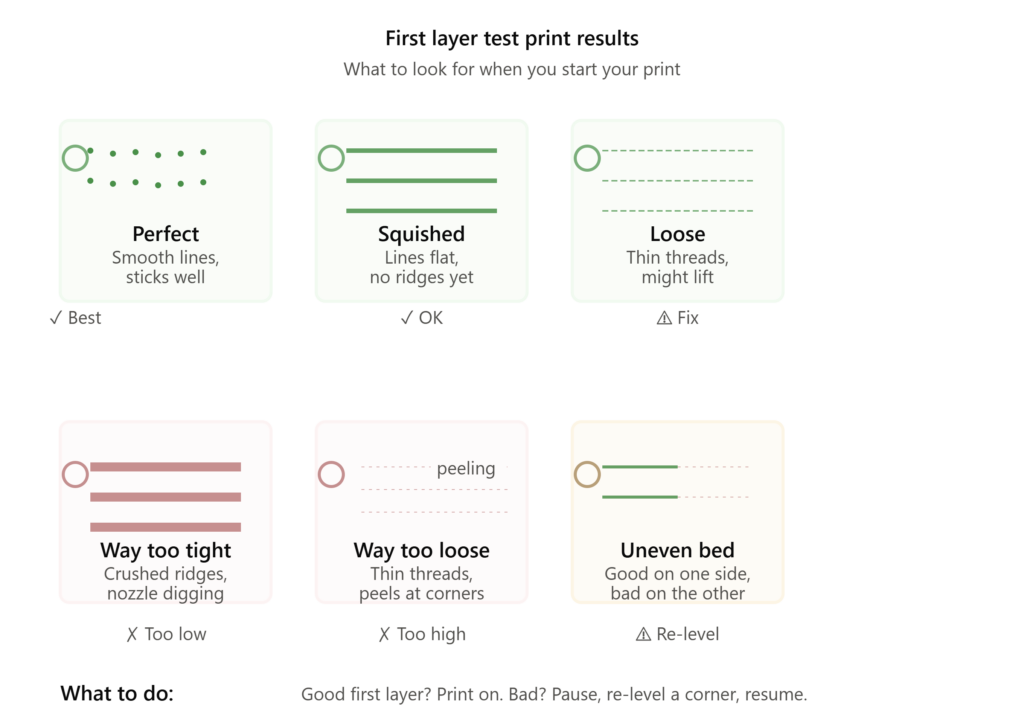
- Watch the first layer — you’re looking for:
✅ Good first layer:
- Plastic comes out as a thin, smooth line
- It sticks to the bed without lifting at corners
- When you finish the first layer, it looks like a thin plastic sheet bonded to the bed
❌ Signs of bad leveling:
- Nozzle too low: Plastic is squished, looks flat, creates ridges, or the nozzle digs into the bed
- Nozzle too high: Plastic comes out as thin threads, doesn’t stick, or peels up at corners
- If it looks bad: Pause the print (Menu → Pause), home the printer, re-level one corner slightly, then resume. Most printers let you resume a paused print.
⭐ Common Bed Leveling Problems (And Fixes)
Problem 1: “My corners are tight but the center is loose”
Cause: Your bed isn’t flat — it’s warped slightly.
Fixes:
- Check your bed’s physical flatness (use a straightedge if you have one)
- Adjust the center slightly lower to compensate
- After leveling, print a bed leveling test file and watch for uniformity
Long-term: If your bed is permanently warped, replacement beds cost $15-25 and take 2 minutes to install.
Problem 2: “One corner won’t level — it keeps being too high”
Cause: The leveling knob is at its limit (you’ve turned it so far it can’t go tighter).
Fix:
- Get a leveling knob spacer (cheap, plastic shims ~$5-8) or cut thin plastic shims yourself
- Install the spacer under that corner’s knob to give you more range
Prevention: If you keep having one corner that’s hard to level, it means your bed frame is slightly warped or misaligned. Check if the printer is on a perfectly flat, level surface (not on a tilted shelf).
Problem 3: “My bed was level yesterday, but it’s off again today”
Cause: Temperature changes. Thermal expansion is real.
Why: Metals expand and contract with heat. After your printer warms up, the bed frame expands slightly, changing the level.
What to do:
- Level the bed after a 5-minute warm-up (heat bed to print temperature, then level)
- Or, if your printer has BLTouch or automatic leveling, use that as a backup
- Most people don’t re-level every print — once a week or every 5-10 prints is normal
Problem 4: “The paper test feels perfect, but the print fails halfway”
Cause: Bed leveling drifted mid-print, or your bed isn’t level because it’s dirty.
Fixes:
- Clean the bed every single time before printing (even if it looks clean)
- If leveling drifts during prints, check that your bed mounting bolts aren’t loose — tighten them gently
- Do a second level test before printing — sometimes leveling shifts slightly when you heat the bed
⭐ Pro Tips from 5 Years of Ender 3 Printing
Tip 1: Keep a leveling routine
- Clean bed → Home printer → Level 4 corners → Test center → Print
- Takes 5 minutes, saves hours of wasted filament
Tip 2: Use the nozzle temperature to your advantage
- Heat the nozzle to 200°C before leveling (especially if printing PLA above 200°C)
- The nozzle expands when hot, so leveling while warm = more accurate
- Wait 2-3 minutes for temperature stabilization
Tip 3: Mark your leveling knobs
- Use a marker to draw a small line on each knob as a reference point
- If you adjust, you can see how much you turned each knob
- Helps you return to a known-good state faster
Tip 4: Invest in a BLTouch or capacitive sensor (eventually)
- Manual leveling works great for years (I did it for 3 years)
- But auto-leveling sensors take the guesswork out
- Not essential, but saves time if you print frequently ($15-30)
Tip 5: Print a leveling test file
- Search “bed leveling test STL” — free files show you exactly what good, bad, and over-leveled look like
- Prints in 2-3 minutes, gives you visual feedback
- Better than guessing
⭐ How Often Should You Level?
Honest answer: It depends on your setup.
- If you print 5+ times a week: Level weekly or every 10 prints
- If you print occasionally: Level every 3-4 prints or when you notice first-layer issues
- If you just built the printer: Level before every print for the first week (you’re learning)
Most issues aren’t about “leveling drift” — they’re about dirty beds and thermal changes. Keeping the bed clean solves 80% of first-layer problems.
⭐ The Takeaway
Bed leveling on the Ender 3 is dead simple once you understand it:
- Clean the bed
- Use paper to test nozzle height at 5 points
- Adjust 4 corners until drag is consistent
- Print a test to confirm
5 minutes of effort saves hours of failed prints. That’s the entire game.
If your prints are failing, 9 times out of 10, it’s bed leveling or a dirty bed. Fix those first before chasing other settings.
Have you struggled with bed leveling?
Drop your specific issue in the comments, and I’ll help troubleshoot. After 5+
years of Ender 3 printing, I’ve seen every leveling mistake — and there’s always a solution.
Happy printing. ✌️